…An Afterthought Pocket
Step 1:
I knitted a stockinette square with a garter border. I marked out, based on gauge and my desired pocket’s size, marked out where I wanted it to be. The top of my pocket, I decided, was to have a rib border which I planned to pick up and knit after the pocket’s completion. Therefore, I marked out where the rib was going to start, and where the rib was going to end (end meaning the bottom of the rib border) was to be where the actual pocket top began. This is important because that was where I am to make my snip for step two. Remember, if you are going to have a pocket on both sides of a sweater, measure the same on both sides, so that they are even.


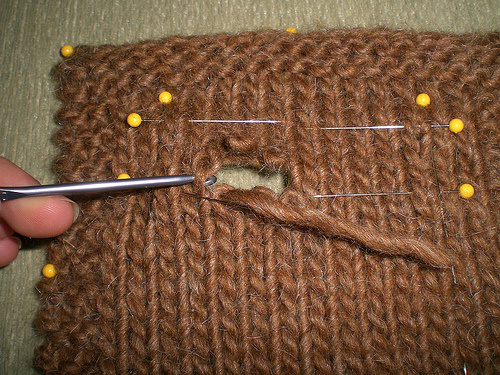
Step 2:
Hold your breath, because you will be SNIPPING into your sweater, but it will be OK. Measure the very center of where the actual pocket-bag begins (not where the top of the rib band will be if you desire to have one). My pocket is 10 stitches wide so measuring out the row I wanted to begin the pocket, I located between stitches 5 and 6 of the row, and snipped.

Step 3:
Unravel the yarn to the left and the right. You will want to unravel however many stitches wide you want your pocket to be, so that will be one half of the stitches on the left of the snip, and the other half of the stitches on the other side of the snip. You will have live stitches on the row above AND below the row you unraveled. I have a 10-stitch wide pocket, so I have 10 stitches above and 10 below (therefore 20 live stitches total). Pick up those stitches. EZ recommends sock needles but since my yarn was so bulky, I just used size 10 double pointed needles. She says to use 2 needles to pick up the stitches on the top, and 1 needle to pick up the stitches on the bottom. From this point on you will basically be knitting the pocket-bag around.


Step 4:
Start with the stitches on the bottom and PURL them, so as to create a “good sharp fold-line” for the pocket edge. When you move around to the stitches on the top needles, knit them, and continue to knit the remainder of the pocket-bag. No more purling. Soon you will have the beginnings of a little pocket that looks like it has been turned out. Continue knitting thus, until your pocket has achieved its desired depth.


Step 5:
At this point you can sew the pocket closed but I really like the 3 needle bind off. So I turned the pocket to the inside and bound off using that technique. In the pictures, I purled the bind off rather than knitting, but knitting your 3-needle bind off (I later realized) is fine and in my opinion, preferable. Sew down the bottom of the pocket and weave in any ends. I used my ends to neaten up the top edge of my pocket.


Step 6:
If you do not want a rib edge, you are finished, turn it over and admire your handiwork!


However, if you, like me, need a border, pick up those stitches (I did a knit 1 purl 1 rib) and knit your border back and forth to its desired length. Sew it down, weave in the ends, and call it a pocket!


No comments:
Post a Comment