April 20, 2014 by tomofholland
Link to the ORIGINAL POST HERE
knitting and casting off the steek stitches
First of all, the pattern calls for six steek sts.
In addition, you will also need some stitches to pick up from: these are called the edge stitches.
So apart from the pattern stitches for the cardigan body, there are two edge stitches, and six steek stitches.
The steek stitches are knitted with both colours held together as one.
When it’s time to cast off, only cast off the edge stitches and the pattern stitches.
The steek stitches will not be cast off.
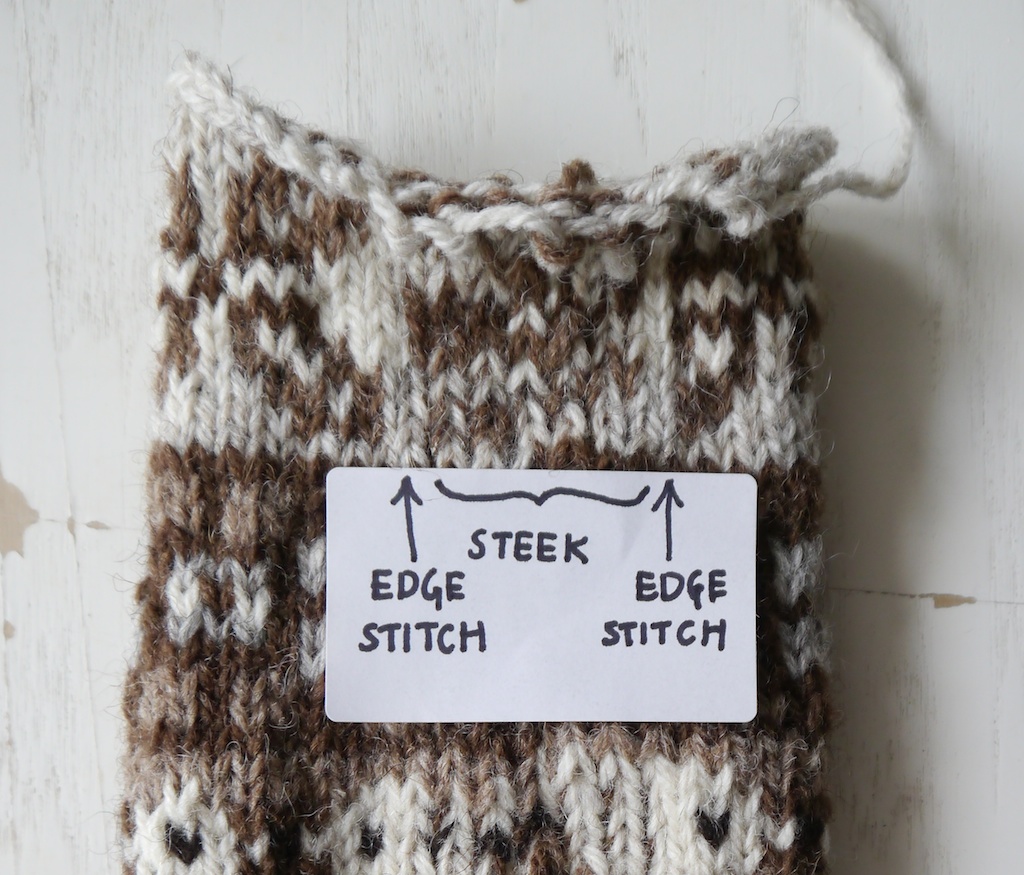
pattern stitches, edge stitches, and steek stitches. Note that the steek stitches have not been cast off
unravelling the steek stitches and cutting
Now comes the fun part. The steek stitches are all dropped down to the cast-on edge, thus creating a whopping large ladder! As the Foula Wool is a bit sticky – the very reason it’s a good yarn for stranded colourwork – you might need to coax them a bit to unravel all the way down. You are now ready for the scary part: the strands forming the ladder are cut in half. Spread the cardigan out a bit so you can easily find the middle of each strand. Remember, knitted fabric doesn’t like unravelling sideways, so it will all be okay.

cutting the ladder strands to create the front opening or the armholes
knotting the strands
The name of this technique – knotted steek – will now become apparent. All the threads are knotted in pairs in an overhand knot. Make sure that you always use the two threads from one row of knitting. Also ensure you snuggle up the knot to the very edge of the fabric for a tidy finish.

The strands are knotted into pairs using the overhand knot, shown above

The knotted steek shown on the wrong side. Notice the tidy row of knots, all snuggled up to the edge of the fabric
picking up stitches
It’s now time to pick up your stitches. You pick up between the edge stitch and the first pattern stitch.
Keep an eye out for the fringe, and try not to trap them with the yarn you are using for picking up.
Now commence knitting the buttonbands or sleeves.

Stitches are picked up between the edge stitch and the first pattern stitch
darning in ends
This is the part that will take a bit of time.
Perhaps because I love darning so much, I really enjoy it.
Be prepared to set aside an afternoon, and make a cup of tea before beginning. You will soon find yourself getting into the rhythm and becoming absorbed by the task at hand. You will need a sharp wool needle with a large eye.
Sometimes called yarn darners, they are basically a chunky version of a crewel needle.
The ends are darned in on the wrong side by skimming the floats at the back.
If you find the strands a bit on the short side, then employ a classic sewer’s hand-finishing technique: first darn in the needle, and only then thread the needle; I use the method explained in this blog post by Stitchers Needle.
By threading the needle with the two yarn ends from one knot it will go quicker than you think. Once the fringe has been darned in, trim the loose ends close to the surface.

darning in the ends. On the right the unfinished fringe. Then the needle skimmed into a float, ready to be threaded. In the middle darned in ends. At the left the loose ends have been trimmed close to the surface

the finished knotted steek on the buttonband. Notice that the edge stitch has turned to the inside, and the neat row of knots
There you have it, a steek which is virtually without any bulk, and which doesn’t impact the stretch of knitted fabric.
Over time, this finish will become neigh on invisible.
I hope this tutorial has been clear and instructive, and has demystified my favourite steek technique.
No comments:
Post a Comment